Quick Guide
- Prioritize high-ground tiles and cover for significant defensive and offensive advantages.
- Control the flow of battle by understanding initiative and effectively managing your Action Points.
- Maintain optimal unit spacing to mitigate area-of-effect damage and create tactical choke points.
- Utilize environmental hazards on the compact grid to your advantage, pushing enemies into danger.
In the steampunk world of Dead Weight, success isn't just about powerful crew builds or ship upgrades; it hinges on your ability to outmaneuver opponents on deliberately tiny tactical grids. Every tile, every move, and every unit's position carries significant weight. Mastering Dead Weight combat positioning is the key to navigating challenging encounters and ensuring your airship crew emerges victorious.
This guide will break down the essential elements of tactical placement, helping you master tile control, optimize movement order, and perfect unit spacing within the game's compact battlefields.
The Core of Dead Weight Combat Positioning
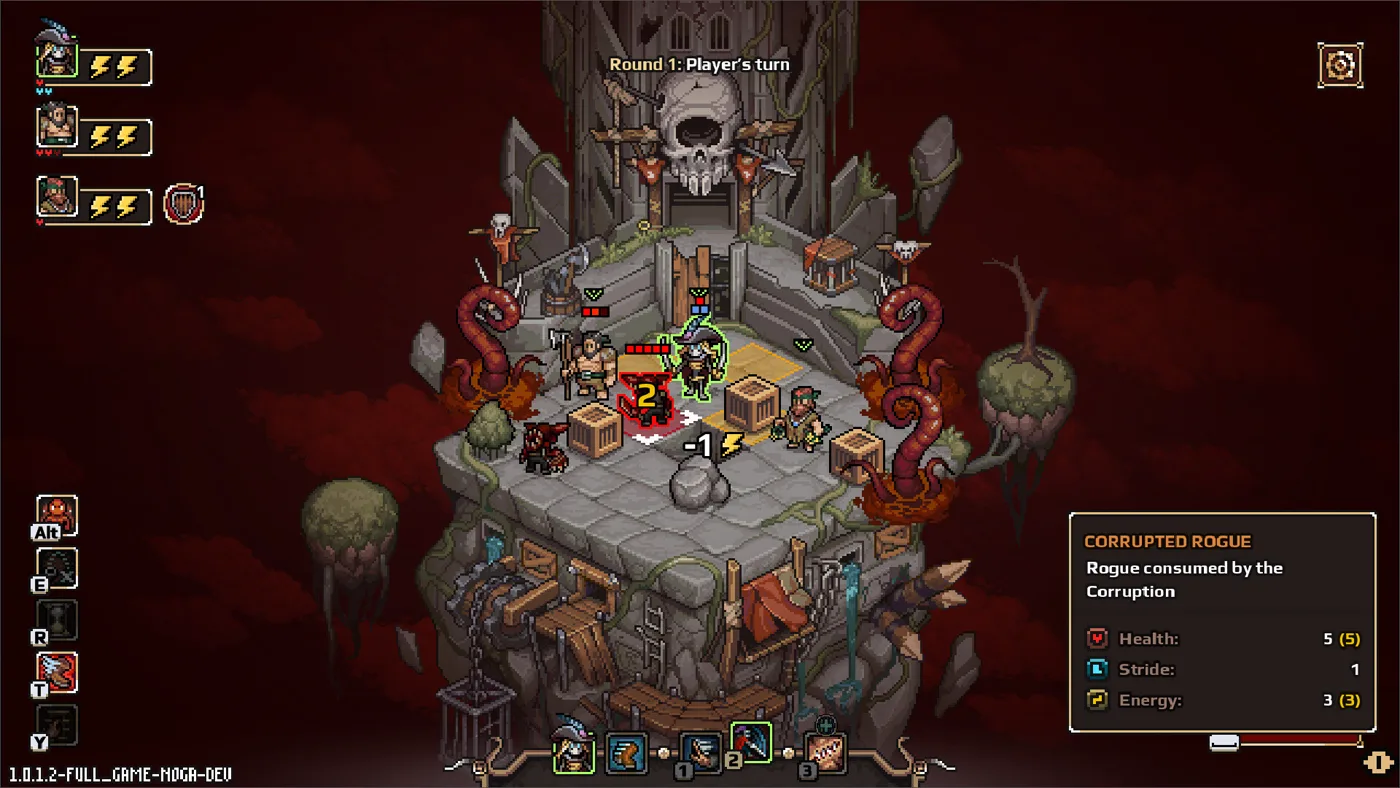
Dead Weight distinguishes itself with a combat system that throws you onto hyper-focused, small tactical grids. Unlike sprawling battlefields in other strategy games, these compact arenas demand precision. There's little to no room for error, making every decision about unit placement and movement critical.
The game's turn-based roguelite nature means that missteps in positioning can quickly snowball into defeat. Smart positioning isn't just a bonus; it's the foundation of careful defense and consistent victory. Your ability to manipulate the environment, control key tiles, and dictate the flow of combat will define your runs.
Understanding the Tiny Tactical Grid
The "tiny tactical grid" is more than just a description; it's a design philosophy. These grids force players to think several steps ahead, considering not only immediate threats but also potential lines of attack and environmental interactions. Key features of these grids include:
- Limited Space: Fewer tiles mean fewer options, but also clearer optimal paths.
- Environmental Interaction: Hazards, cover, and elevation are often tightly packed.
- Choke Points: Natural bottlenecks are common, creating opportunities for strategic defense or offense.
Your primary goal on these grids is to maximize your advantages while minimizing enemy opportunities.
Mastering Tile Control and Terrain
Effective tile control is about more than just moving your units; it's about owning the most advantageous spots on the map. Terrain features on Dead Weight's battlefields are not mere aesthetics; they offer crucial tactical benefits that can turn the tide of a fight.
High Ground and Cover Advantages
Always be on the lookout for elevated tiles. Positioning units on high ground often grants bonuses to accuracy, range, or damage, while simultaneously making them harder for ground-level enemies to hit. Similarly, cover, whether it's a stack of crates or a ruined wall, can provide defensive buffs, reducing incoming damage or increasing dodge chance.
Prioritize high-ground tiles for defensive and offensive bonuses.
Placing ranged units on elevated positions can give them superior line of sight and protection, while melee units can use it to create chokepoints.
Conversely, be wary of leaving your units in exposed, low-lying areas. These become prime targets for enemy attacks, especially from ranged units positioned above.
Environmental Hazards and Choke Points
The tiny grids of Dead Weight are frequently dotted with environmental hazards. These can include explosive barrels, steam vents, or precarious ledges. Learning to exploit these is a cornerstone of advanced combat positioning. Pushing or pulling enemies into these hazards can deal significant damage or even instantly defeat them.
Choke points are narrow passages that restrict enemy movement. By positioning a durable melee unit or a unit with area-of-effect (AoE) abilities in a choke point, you can effectively bottleneck enemy forces, controlling their advance and allowing your ranged units to pick them off safely.
Optimizing Movement Order and Action Points
Movement isn't just about where you go, but when and how much. Dead Weight's turn-based system places a premium on understanding initiative and managing your Action Points (AP) to dictate the flow of battle.
Initiative and Turn Economy
Each unit, both friendly and hostile, has an initiative value that determines their turn order. Paying attention to this order allows you to anticipate enemy moves and plan your actions accordingly. Can you eliminate a high-threat enemy before they get a turn? Can you move a unit into cover before a powerful enemy attack? These considerations are vital.
Action Points are your currency for movement and abilities. Units might start with a base amount, and community reports suggest that you can increase your Action Points through gameplay, offering more tactical flexibility. Efficient AP management means not wasting movement, ensuring every step serves a strategic purpose, and saving enough AP for critical attacks or defensive maneuvers.
Strategic Unit Placement
Beyond just moving to a tile, consider the implications of that placement for the entire turn. Do you need to flank an enemy for a backstab bonus? Do you need to position a support unit to buff multiple allies?
Think about "overwatch" or "guard" abilities if your units possess them. Placing a unit in a strategic position to cover an area, ready to react to enemy movement, can be incredibly powerful. This pre-emptive positioning can deter enemies or punish them for advancing.
Effective Spacing and Threat Management
On a small grid, friendly fire or being caught in enemy AoE attacks is a constant danger. Proper spacing is crucial for mitigating damage and setting up effective counter-attacks.
Avoiding Area-of-Effect Attacks
Many enemies in Dead Weight will possess abilities that affect multiple tiles. Clustering your units together, especially in a compact battle, is an open invitation for devastating AoE damage. Learn the typical ranges and patterns of enemy AoE attacks and spread your units out sufficiently to avoid having multiple allies caught in a single blast. This often means sacrificing adjacency bonuses for survival.
Creating Defensive Formations
While spreading out is key for avoiding AoE, there are times when a tight formation is necessary for defense, particularly when creating choke points or protecting a vulnerable unit. A common tactic is to form a defensive line with tankier units, shielding squishier damage dealers or healers behind them.
Consider how your units' abilities interact with their positions. A unit that grants buffs to adjacent allies might need to be positioned differently than a lone wolf damage dealer. The goal is to create a formation that maximizes your team's strengths while minimizing vulnerabilities.
Advanced Positioning Tactics
Once you've mastered the basics, you can start incorporating more nuanced Dead Weight combat positioning strategies:
- Baiting: Position a resilient unit slightly ahead to draw enemy fire, creating an opening for your damage dealers.
- Push/Pull Mechanics: Many units will have abilities to push or pull enemies. Use these to manipulate enemy positions, knocking them off ledges, into hazards, or into the range of your other units.
- Line of Sight Blocking: Sometimes, the best defense is to block an enemy's line of sight to a vulnerable unit by placing another unit or environmental object in the way.
- Cornering: On tiny grids, it's often possible to corner enemies against walls or other impassable terrain, limiting their movement options and making them easier targets.
By consistently evaluating the grid, predicting enemy movements, and leveraging your crew's unique abilities, you'll transform from a reactive player to a master tactician, ready to conquer any challenge Dead Weight throws your way. For more information on the game, visit the official Steam page: Dead Weight on Steam
FAQ
How important is combat positioning in Dead Weight?
Combat positioning is extremely important in Dead Weight. The game's deliberately tiny tactical grids mean every tile and unit placement decision has a significant impact on the outcome of battles, making smart positioning crucial for survival and victory.
What are the main elements of effective positioning on tiny grids?
The main elements of effective Dead Weight combat positioning involve mastering tile control (using high ground, cover, and hazards), optimizing movement order and Action Point usage, and maintaining proper unit spacing to avoid AoE damage and create defensive formations.
Can I increase my Action Points (AP) for more movement options?
Yes, community reports indicate that you can increase your Action Points through gameplay in Dead Weight, which provides more tactical flexibility and options for movement and ability usage during combat.
How do I use environmental hazards effectively in Dead Weight combat?
To use environmental hazards effectively, identify elements like explosive barrels, steam vents, or ledges on the grid. Then, use abilities that push or pull enemies into these hazards to deal extra damage or remove them from the fight, leveraging the environment to your advantage.